

How To Get Started On Youtube For Makeup
Ultimate Guide to Dazzler on YouTube - Gear, Makeup Tutorials, and More than

Mar 31, 2022• Proven solutions
Beauty and lifestyle are ii of the about popular categories on YouTube, and they might also be the categories most associated with brand deals. Whether you're hoping to earn revenue as a beauty influencer, or just want to mail some fun makeup tutorials, this guide is for you!
We'll walk you through deciding on a theme for your channel, setting upwards your equipment, and requite you tips for actually recording your videos.
-
Finding Your Niche in Beauty or Lifestyle
-
Types of Beauty Videos – Your Content Strategy
-
How to Become Products to Review
-
Simple Camera Setup for Beauty Vloggers
-
Lighting for Beauty
-
Top Ring Lights for YouTube
-
Build Your Own Diva Ring Light
-
How to Make a Makeup Tutorial – Before You Offset
-
How to Brand a Makeup Tutorial – Recording
-
How to Make a Makeup Tutorial – Afterward Shooting
All-time YouTube Video Editor- Wondershare Filmora
Wondershare Filmora is specifically fabricated keeping quality on priority and to make sure all the videos are edited well with the highest accuracy. You can trim, merge, crop, add together background music, rotate videos also as add motion elements, blithe texts, overlays, and filters, etc. to your makeup video, and the video can as well be uploaded to YouTube or burned to DVD directly.


Finding Your Niche in Beauty or Lifestyle
As a new makeup, beauty, or lifestyle YouTuber you'll exist jumping into a category that's already packed with thousands of channels. In order to gain whatever momentum, yous'll have to decide on a particular thing yous desire to be known for. That's your niche.
People looking for beauty tutorials are ofttimes looking for someone who has something in detail in common with them. Hairstyling for a specific ethnicity, for case, is a potential niche because people want to learn how to style their own hair, not a hair in general.
Another fashion you could find a niche is by taking on a specific expanse of interest, like a skincare channel with a focus on coping with acne or a makeup channel with a focus on natural products.
SunKissAlba has a lifestyle channel that focuses on a 'natural' niche. She posts videos about every aspect of her lifestyle from putting on makeup to cooking, but natural/non-toxic products are a abiding theme through everything she does. By niching her channel she hasn't limited what kinds of videos she tin can do at all - she posts a huge variety of different types of videos. What she has washed is to make her channel particularly valuable to audiences interested in things that are natural or organic.
Types of Beauty Videos – Your Content Strategy
It's a lot easier to come up with weekly video ideas when you accept an overarching strategy.
The easiest fashion to effigy out what kinds of videos you should make (and this can also aid decide your niche!) is to think about what you already practice and savour. If skincare is particularly important to you, for example, then you could build a content strategy that includes things like your favorite sunscreen, what different ingredients in skincare products are for, or even how to make a DIY confront mask.
The same matter goes if y'all love doing large glamourous makeups for going out. Recall about what you like, and that will make up one's mind what you should talk most in your videos.
Instead of ownership new products to employ in videos, try to apply and showcase what y'all already accept.
Here are some common types of beauty and lifestyle videos:
Get Ready With Me: a video where you put your makeup on which helps your audition get to know you better.
Monthly Favorites: showcases your favorite products from the concluding month.
Makeup Collection: viewers volition want to come across what you take.
DIY: create something, similar a bootleg moisturizer, and bear witness your viewers how to brand their own.
Makeup Hauls: evidence off what you've bought recently.
Lookbooks: put together a few looks based on a theme, like a specific colour or event.
Start Impressions: prove yourself using a new production for the first fourth dimension.
Makeup Tutorials: teach your viewers how to reach a item look, like a smokey eye.
What's In My Pocketbook : empty your purse to testify viewers what you lot carry around with you, particularly your most essential makeup.
My Routine: prove viewers your morning skincare routine, or how yous usually have your makeup off earlier bed. Whatsoever of your beauty-related routines volition be interesting to your followers.
Y'all should as well be set up to jump on trends as they jump up. You tin get a bump in viewership from people searching for a detail trend. Here are a couple of examples of past trends:
- Beau Does My Makeup
- Child'south Makeup Challenge
- No Mirror Makeup Claiming
How to Get Products to Review
You lot probably already know that a lot of the products pop beauty YouTubers review in their videos were sent to them for complimentary. Brands want to go their products into the hands of creators who accept 'influence' both in the hopes that their audiences will decide to purchase them and as part of generating buzz – getting more people talking about their products so more than people become interested.
In order for a brand to consider sending you a costless production to review or feature in a video, y'all will first have to accept a large enough following.
What is 'large enough'? There's no magic number of YouTube subscribers or Instagram followers. How large your following needs to be will depend on what brands you desire to piece of work with, as well every bit whether your channel has a specific niche.
Large brands will desire to work with larger creators. Smaller brands that are withal trying to build notoriety may be more than open up to working with creators whose followings are not as large.
If you lot have a very specific niche then that could create more opportunities for you lot as a mid-sized YouTuber. If you lot specialize in styling curly blackness pilus, and a brand is marketing a product made specifically for styling curly black hair, then your smaller following volition be more valuable to that brand than the larger audition of a more than general channel.
Here are 4 tips for getting gratis products for review:
- Follow your favorite brands on Instagram and subscribe to their YouTube channels. Brand sure to take them when you feature their products in your posts or videos.
- Focus on growing your community/audience. Equally you showtime getting more subscribers and building up momentum for your channel, brands might starting time reaching out to y'all. We've got some tips on growing your YouTube channel here .
- Make a pitch to a make. The starting time step in this is figuring out who to pitch to. Y'all can ship smaller brands DMs via Instagram or Twitter and politely ask for contact info for a PR person. Never inquire for gratis product or sponsorship at this betoken, but data y'all can use to contact PR.
- Send an e-mail with your pitch to the brand's PR person. Your electronic mail should innovate yourself, describe your content, and talk about what blazon of audience you lot take (how many subscribers, where are they located, how sometime are they, etc. This information is all available in your Creator Studio analytics).
Make sure to link to your channel so they can verify what you say (practice non hibernate your subscriber count).
Emphasize what value you could provide the brand with (i.e. 'I've had a lot of success with videos on managing acne and I'm sure my subscribers would honey to see a review of your foam') and outline what kind of video you'd like to make (i.e. a v-infinitesimal review focusing on the production, or a curt feature in a longer makeup tutorial).
Simple Photographic camera Setup for Beauty Vloggers
There are a lot of different ways to ready upwards your photographic camera for a 'talking head' video (anything that is primarily you talking to the photographic camera). Go along reading to learn about a pop band-light setup for beauty videos, or click here to learn 4 different camera setups .
In an platonic situation, this is what you'll build your setup out of:
- Camera with a flip-out screen
- Ring calorie-free
- Camera-mounted shotgun mic
- Tripod (unless you tin can mount your camera inside your ring low-cal)
If you don't take admission to all of the equipment in a higher place, try some of these:
- Smartphone camera
- DIY ring low-cal
- Smartphone shotgun mic or LAV
Step ane: Set up your photographic camera and ring light (your photographic camera should be sitting directly backside your ring low-cal, or mounted within of information technology) up about iii feet abroad from your bailiwick (yourself).
You might desire to experiment with sitting at dissimilar distances to see how the lighting looks on your face.
Step two: Set your camera up a scrap college than your face and tilt information technology downward towards yourself (shooting from slightly in a higher place is always more flattering). Information technology should be gear up up at almost a 15° bending to you.
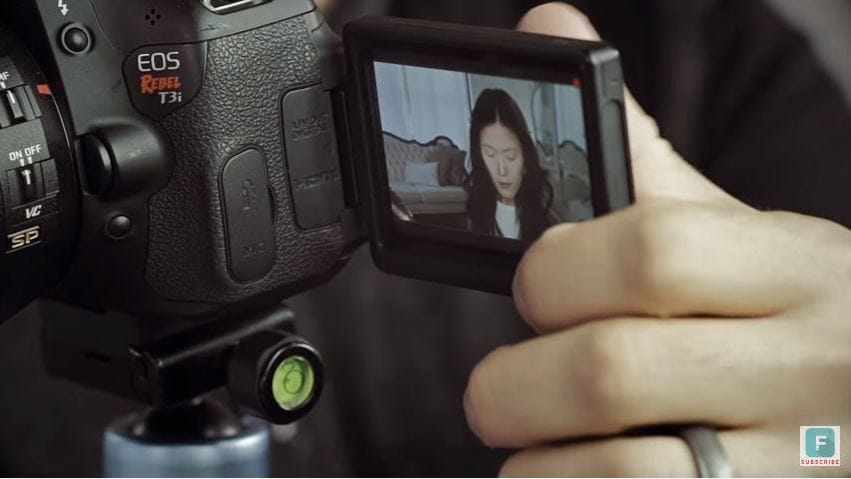
Step 3: Check your frame (this is easiest if your camera has a screen that flips out) to make sure in that location's not too much empty space in your shot.
Step four: Adjust your camera's focus so your picture is clear. You may need to set up a lamp, chair, or stuffed animal equally a stand up-in for yourself while you stand backside the photographic camera adjusting the focus.
Plough off autofocus and adjust your focus manually past turning the focus ring on your lens, if you're using a DSLR or mirrorless camera.
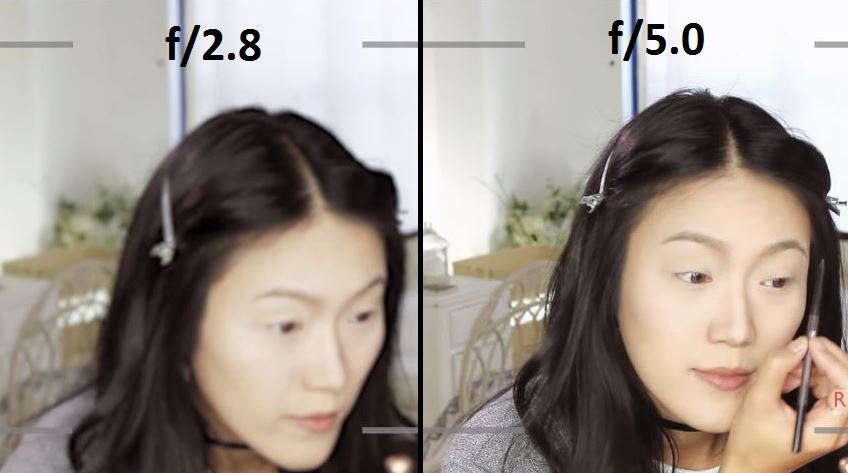
Stride 5: Gear up your f-cease (aperture) and so that your depth of field is deep plenty for you to lean forwards or astern without becoming blurry.
An discontinuity of f/v.0 is good if yous're going to be moving around a lot, but if you lot're not going to exist moving much and want a blurry background you might want to go with f/ii.eight or lower.
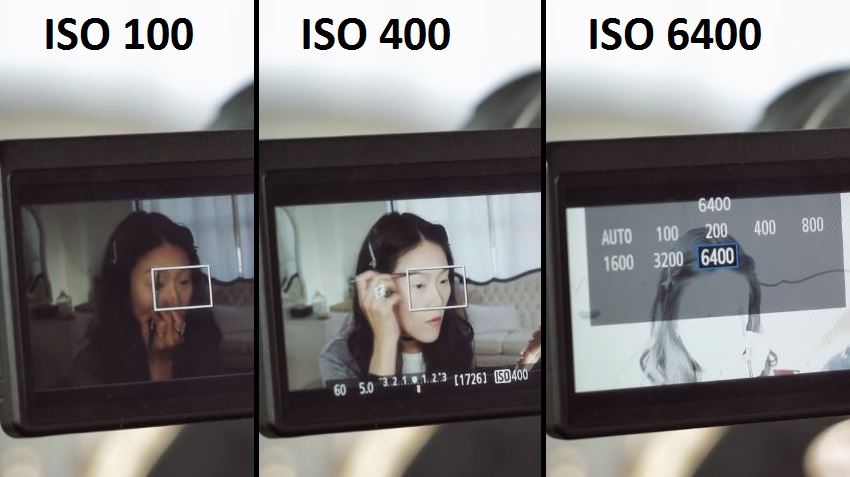
Step six: Set your ISO (moving-picture show speed). A lower ISO will give you a darker, only higher quality, image. A higher ISO will lower your quality and give you a brighter image.
ISO 400 should exist a happy medium for shooting inside with your ring calorie-free, but you may need to endeavor out a couple of settings to discover one perfect for your situation.
For more info on camera settings for dazzler videos, click here .
Lighting for Dazzler
The cardinal to achieving a loftier-quality picture for your beauty video is having a lot of light.
A ring light (whether it's one you purchase or one you lot make ) will give y'all even light over your whole face, and that may be enough. Ring lights are considered one of the biggest 'secrets' to beauty on YouTube ( equally explained in this Racked article ).
There are, however, some reasons you might want boosted light:
To Light your Groundwork/Space
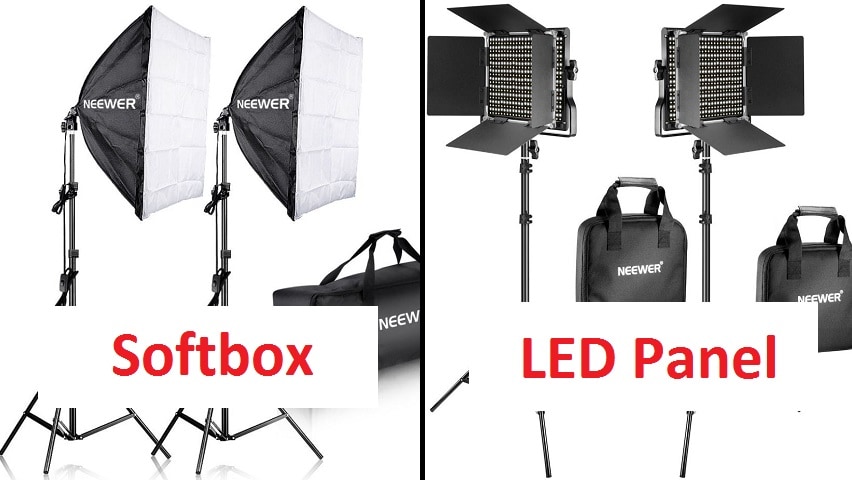
If you simply have a band calorie-free/front calorie-free and then you may cease up looking like y'all're surrounded by shadows. If you want more light for your infinite you can use windows, household lamps, or professional person video lights like softboxes or LED panels.
To Stand Out Against your Background ('Backlighting')
A front light that's lighting y'all evenly is too lighting any's behind y'all evenly, which can make your overall motion-picture show await flat.
Setting upward a low-cal to shine upward at you from behind will help you pop out from your background by creating a silhouette.
You lot can use an LED panel or a household lamp as a backlight.
To Add Dimension to Your Face (Side Lights/ Fill Lights)
Setting up lights to striking y'all from the sides will help you look more three dimensional. Information technology can also give your video a general quality boost because the picture quality is ever better when there'due south tons of light.
You tin can use softboxes, LED panels, clamp lights, household lamps, or any other light source y'all can think of.
Lighting Tips!
- Use 'daylight' bulbs in any household lighting/clamp lights you use. This way, your light will all exist the same color and y'all won't have to do a lot of color correction (the more than yellow-colored light well-nigh indoor lights give off will brand you lot look orange).
You can buy daylight-colored bulbs for about $v.
-
Clench lights ($10 each) and paper lanterns ($x each) provide neat lighting and are much more than affordable than professional person lighting kits. The newspaper lanterns will provide even, diffused, light and the clamp lights will exist easy to fix wherever you lot need them.
-
Bank check out these DIY tips for creating your own reflectors and diffusers.
Acme Ring Lights for YouTube
1. Neewer Dimmable Fluorescent Band Calorie-free - $110
One absurd feature of the Neewer Ring Light is that you can cull between daylight and a more than orange-tinted light depending on which of the included filters you use. In virtually all situations you'll want to use white light/daylight because the orangish light will make you lot wait orangish, only if you ever wanted to create a warmer image to achieve a particular effect you'd have that pick with this lite.
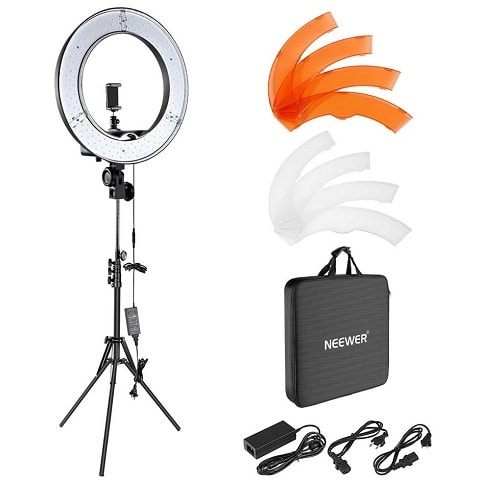
This light is dimmable and tin can exist adapted to the angle that suits your shot. That's true of our number 2 pick also, and the second identify light actually has a slight edge over the Neewer light because its color temperature is 5400K which is slightly closer to daylight than Neewer'due south 5500K, but that's honestly non super of import for YouTube. They're close enough that you lot won't be able to tell the departure, and this low-cal is over $100 more than affordable.
two. Prismatic Halo Ring Light - $260
This lightweight ring lite is easy to transport, ready, and mount your phone or camera to. It'south a fluorescent 'daylight' (5400K) light, so the colors in your videos volition look natural.
This light is dimmable, so you can turn it down if information technology'due south too brilliant, and the Prismatic Calorie-free Stand will allow you to tilt your light to the perfect angle. This will exist handy if you're mounting your camera inside the ring but want to place information technology slightly to a higher place your face instead of having it look at you caput on.
Build Your Own Diva Ring Low-cal
A band light is an important tool for a lot of beauty YouTubers, but it doesn't fit into everyone's budget. Hither'south one pop way to create your own ring low-cal for nearly $20.
A lot of people have done this DIY, but we're using Kevin'southward video because we love how he added the stand.
What you need:
- A wire wreath frame
- Cipher ties
- LED rope calorie-free (16 ft, daylight)
- Tinfoil
- Metal paper towel stand
- Scissors
Step 1: Wrap your wreath frame in tinfoil. Make certain the tinfoil is shaped to the wreath so that there is a bend on the inside where your rope light can sit.
Step two: Place your rope light inside the bend of your frame. Wind information technology around for 3 loops then you lot have 2 rows of lighting tube sitting next to each other.
Step 3: Use the zip ties to fasten in the rope light. Wrap them tightly around your frame and lights in several (6-eight) places.
Stride 4: Cut off the tails of the zip ties.
This is your ring calorie-free. Proceed to step 5 if you want it to have a stand (you might only want to clip information technology upwards somewhere).
Step 5: Fasten your band light tightly to your paper towel stand deeply with several nada ties. Brand sure to spike it at the bottom (where the excess rope light is coming out of your ring light). Cut off the tails of the zip ties.
How to Make a Makeup Tutorial – Before You Start
Earlier you kickoff recording your makeup tutorial there are a few things you lot should do.
-
Write an outline. You might even desire to write yourself a transcript. Having a physical programme before you lot start recording will help ensure your tutorial is useful for viewers. You'll realize where you might need to dull down and bear witness a detail step in more particular, or where your viewers might find a particular step tricky, in a way you lot want if you only jump into a makeup routine y'all know perfectly.
-
Layout your supplies. Make sure everything you need for your tutorial is laid out neatly in front of you lot so you tin access it all easily. Try to apply clean brushes – it just looks nicer.
-
Tidy up. If you want your viewers to trust yous when it comes to aesthetics, information technology's important that your studio surface area is clean and tidy. You may even desire to use a backdrop.
-
Practice a video test. Before you get-go your video for real, starting time recording and shoot some test footage. Watch that dorsum to make certain you similar the await of your frame, your confront is never blurry, and yous're happy with the overall look of things.
-
Do an sound test. If you're going to be talking in your video instead of recording a voiceover after, do an audio test to make certain your audience will be able to hear you clearly.
How to Brand a Makeup Tutorial – Recording
Here are some things to go on in listen while you lot tape your makeup tutorial:
- Show what you're using. When yous utilise a production, castor, or whatever other dazzler supply brand certain to permit your audience know what yous're using and why you chose it. This isn't about promoting brands, it's about making information technology easy for viewers to duplicate your results.
If you're using autofocus, you can concord products up to the screen and wait for it to kick in. If you're not using autofocus, merely hold them upward side by side to you for a moment. Yous can also shoot separate closeups of each product and cut them into your main tutorial video.
-
Highlight pocket-sized details. Describe what you're doing in a lot of detail and don't gloss over anything. Assume the person watching your tutorial doesn't know annihilation well-nigh putting on makeup.
-
Take stills for your thumbnail. Recall to take some yet photos of your finished makeup to apply in your YouTube thumbnail.
How to Make a Makeup Tutorial – After Shooting
Once you've finished recording and put away all your camera gear, there'due south still work to do. You still need to edit your video and mail it on YouTube. Here are some tips for that:
- Add transitions and effects. If you have several clips or even just singled-out sections of your main clip, then calculation transitions can be a swell way to hold your viewers' attention.
If you lot spend a lot of time on a repetitive step, y'all may want to speed that part up and get in a time-lapse.
-
Add your intro. Having a short (usually around v seconds) intro sequence is a great way to strengthen your personal lifestyle brand. You can download free intros right here on filmora.io.
-
Title your video. Make sure your near important keyword – the type of expect you're creating, or a product you're reviewing – is nigh the commencement of your video's title. Searching for the topic of your video and writing a title similar to the highest-ranking results is a good way to start.
Recollect to include what blazon of video yous made, i.e. 'tutorial', 'review', or 'become set with me', in your title. People might include these kinds of words in their search queries and, fifty-fifty if they observe your video some other fashion, they'll probably want to know what they're clicking on before they click.
-
Customize your thumbnail. Once again, search for your video's topic and see what comes upwards. You want your thumbnail to look related to the summit results, but you lot also want it to leap out at potential viewers. In that location may be something you can add to the thumbnail photos you took that will help you stand out, like a bright border, an emoji, or a closeup of a product you feature in the video.
-
Write a detailed description. Putting the products you employ in your video clarification will help your viewers, and it's a great place to include affiliate links if you ever join an chapter program (like Amazon'southward) to generate some revenue.
Are you already making beauty videos? If so, allow united states of america know if you have whatsoever of your own tips!
Source: https://filmora.wondershare.com/youtube/ultimate-guide-to-beauty-on-youtube-makeup-and-beauty-videos.html
Posted by: delacruzlinto1997.blogspot.com
0 Response to "How To Get Started On Youtube For Makeup"
Post a Comment